Integrating eSign into your Python Application
All the code for this project can be found here. To see the code AFTER eSign was integrated checkout the esign branch
A lot of apps use a checkbox to collect consent from their users. While this works most of the time, cases arise where it’s not enough. Need users to sign a waiver? A statement of work? You’ll need to get your hands dirty with an eSignature API.
Our example app
For the sake of this guide, we’ve created an example Python / Flask app. Never used Flask? No problem! The framework is designed with simplicity in mind. The only Flask specific lines of code pertain to mapping URLs to functions. Additionally, it uses SQLite for persistent data which means the app packs its own database.
Get up and running
Clone the repo and open it.
git clone https://github.com/koptional-org/esign-python-app.git
cd esign-python-app
Set up a python environment (Optional)
python3 -m venv venv
source venv/bin/activate
# You should now be in a virtual environment where your dependencies are encapsulated from
# the global python dependencies
Install dependencies
pip install -r requirements.txtNow you can run!
export FLASK_APP=main.py; export FLASK_ENV=development; flask run
Keep this project open in your text editor as we will be adding code throughout this guide. We’ll really quickly touch on what the app does first.
App Background
This app records your software projects. In other words, it lets you add projects that you’re working on or have completed. You provide some data on who the client is, along with the billing structure and cost. Finally, you may mark a project as “complete”.
We want to know whether or not the client has officially signed off on the project. We also want a copy of contracts that have been signed. If you do client work, this might be part of your pipeline. Currently, the code maintains a “signed_pdf” property, but there’s no way to set its value. That will be the goal of this guide, to use eSign to seamlessly track which clients have given the green light, and link to their agreement.
** This app does not support adding new users. The only user is hardcoded in the configuration file. The username for which is admin and the password is default **
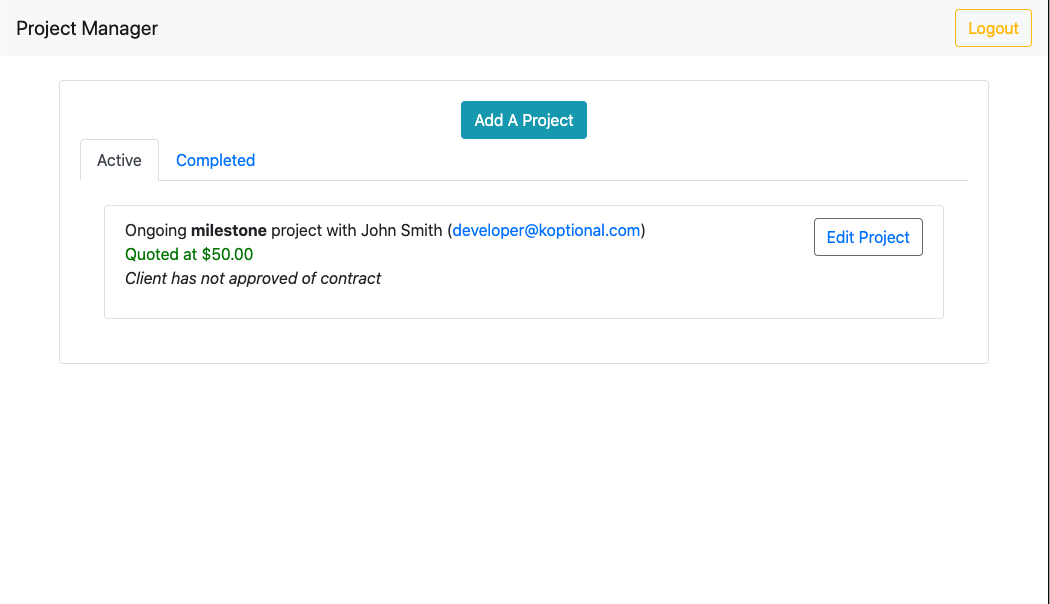 A very simple project organizer
WaiverCat
WaiverCat is the simplest and most cost effective way to get up and running with eSign. And you don’t have to pay a dime or enter a credit card to get started. Go ahead and sign up for an account here to begin. Make sure to check the box that says I'm a developer and will need to use the WaiverCat API!
Creating a signable document
WaiverCat takes standard PDF documents and makes them e-signable. It also lets users input custom info like their name, company or title.
We’ll use this scope of work agreement PDF as our document. If you open the document you’ll notice that it expects two parties to sign, date, and type their names:
- You, the developer.
- Your client.
Typically you would upload this PDF and then “prepare the document”- that is, click within WaiverCat’s PDF viewer on the places where each party has to sign and input information.
Luckily, we can use a shortcut in this tutorial so we can focus more on the integration.
Shortcut: Using a pre-cut template
Login to WaiverCat, and go to the “Resources” page, which you will see on the sidebar menu. Towards the bottom you should see a button that says “Create a form from a template”. Click on this, and select the “Software Development Agreement” option.
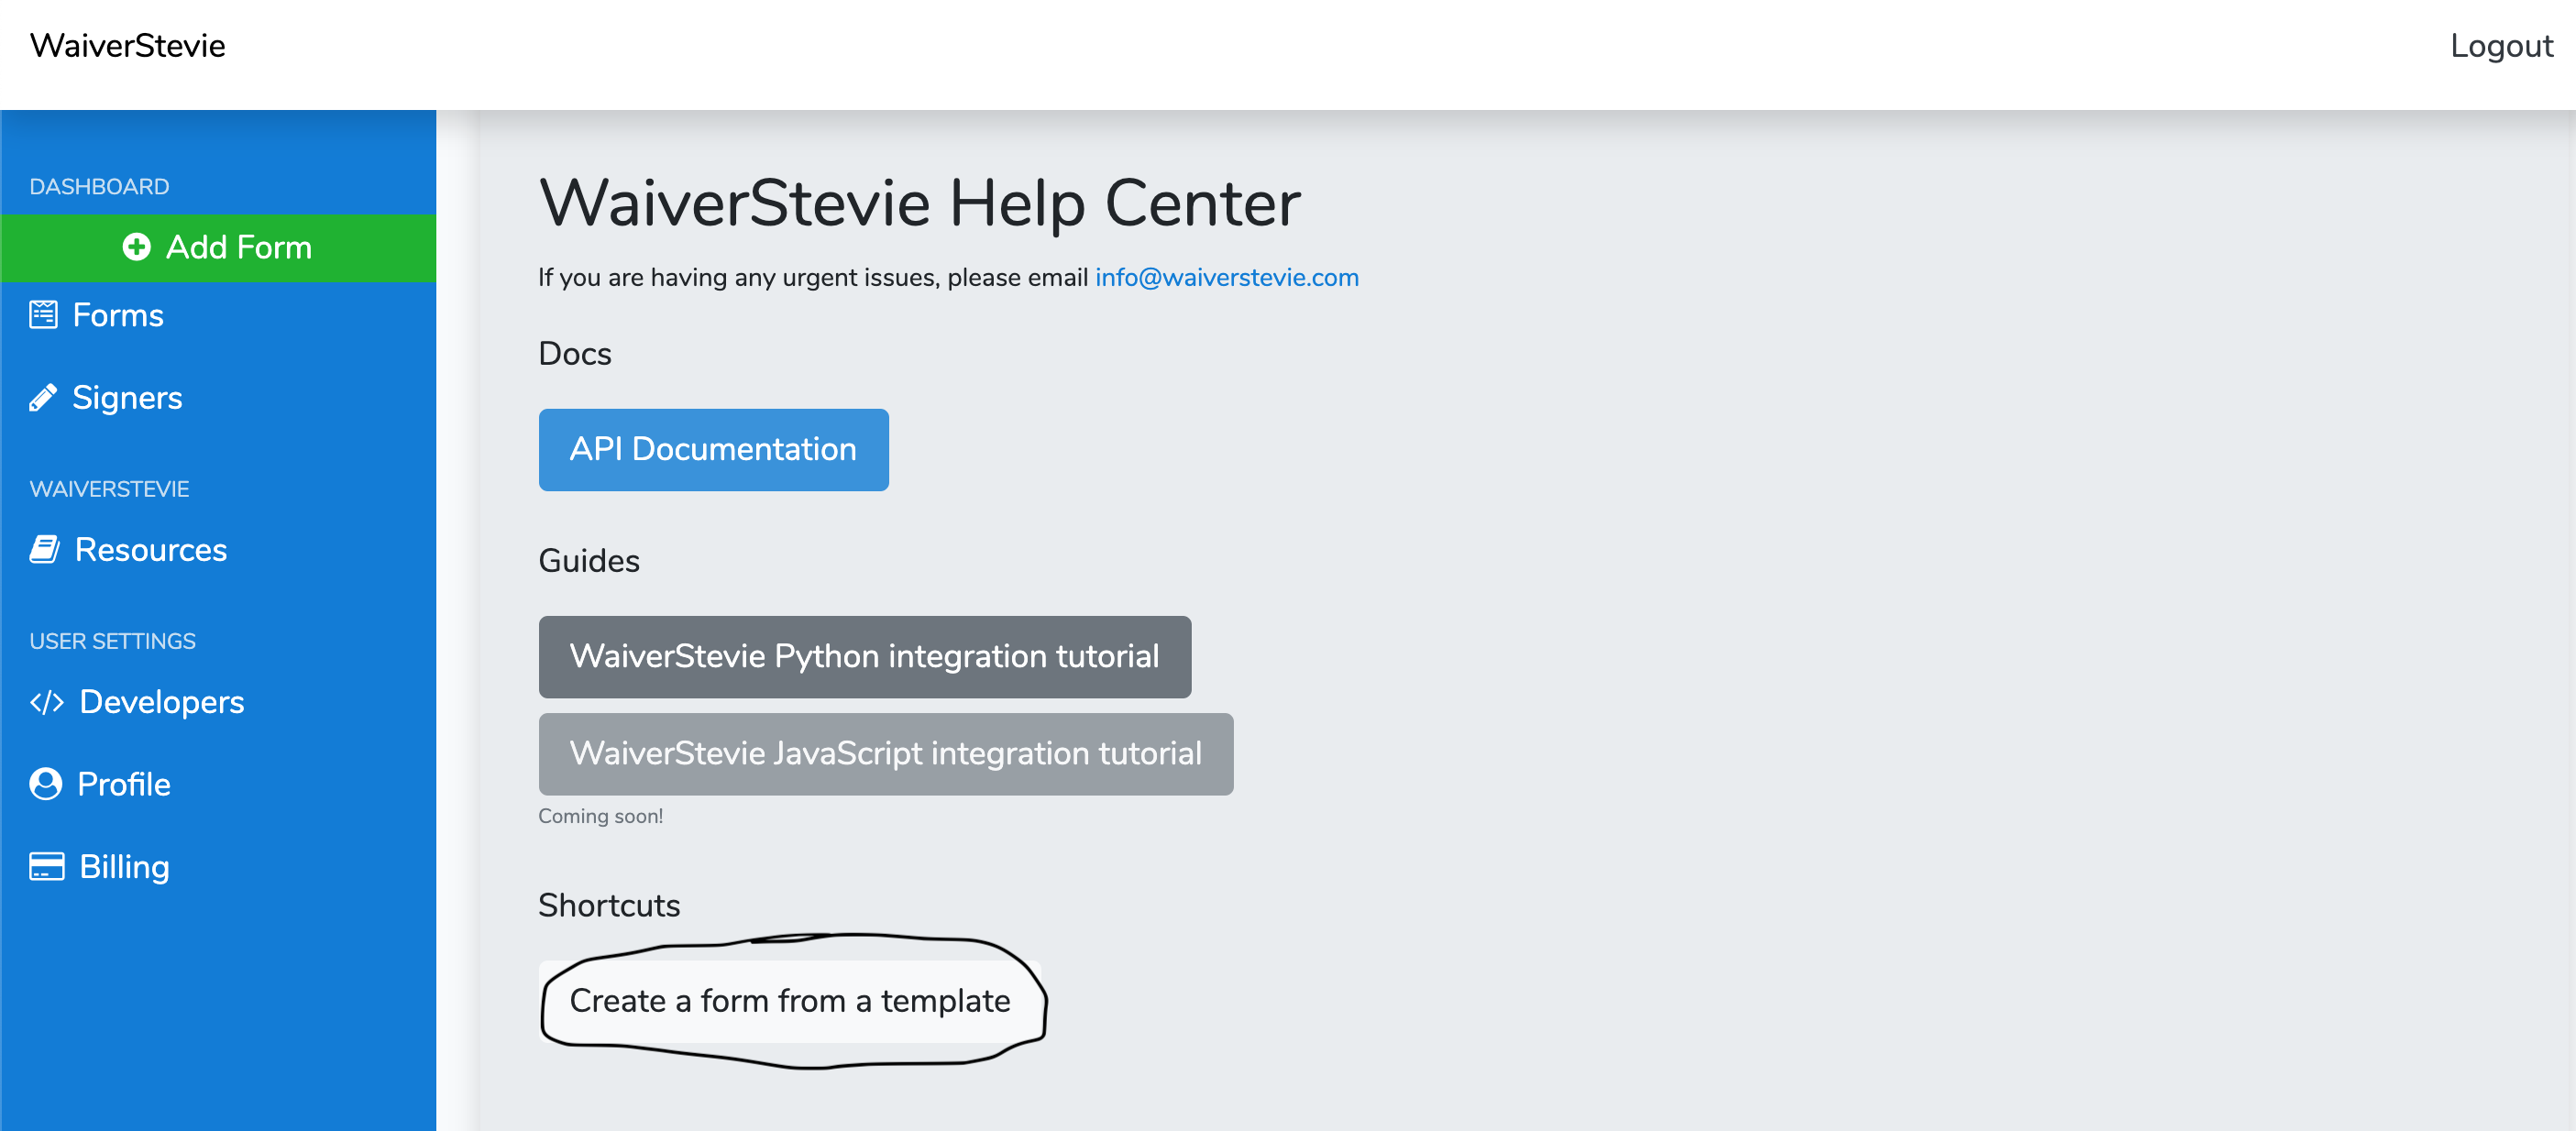 WaiverCat form template shortcut
 Developer agreement template
You should find yourself on the “Forms” page and see the form we just added. If you click “Send envelope”, you will be able to add two parties, and WaiverCat will then prompt them to fill out and sign. Feel free to play around with this feature.
Finally, on the forms page, notice the “prepare for signing” button. When we chose to use a template, we really did two things at once:
- Uploaded a PDF document.
- Told WaiverCat where data should be spliced onto the form.
Thus we won’t need to prepare this doc as it’s already been done for us. However, to better understand what preparing a document is and how to do it, I encourage you to check out the short guide on that.
Just remember that we’ve configured this doc such that there are two parties, you being the first and your client- whoever that is- being the second.
Project Configuration
Your API Key
For more in-depth info on WaiverCat endpoints, checkout our API docs
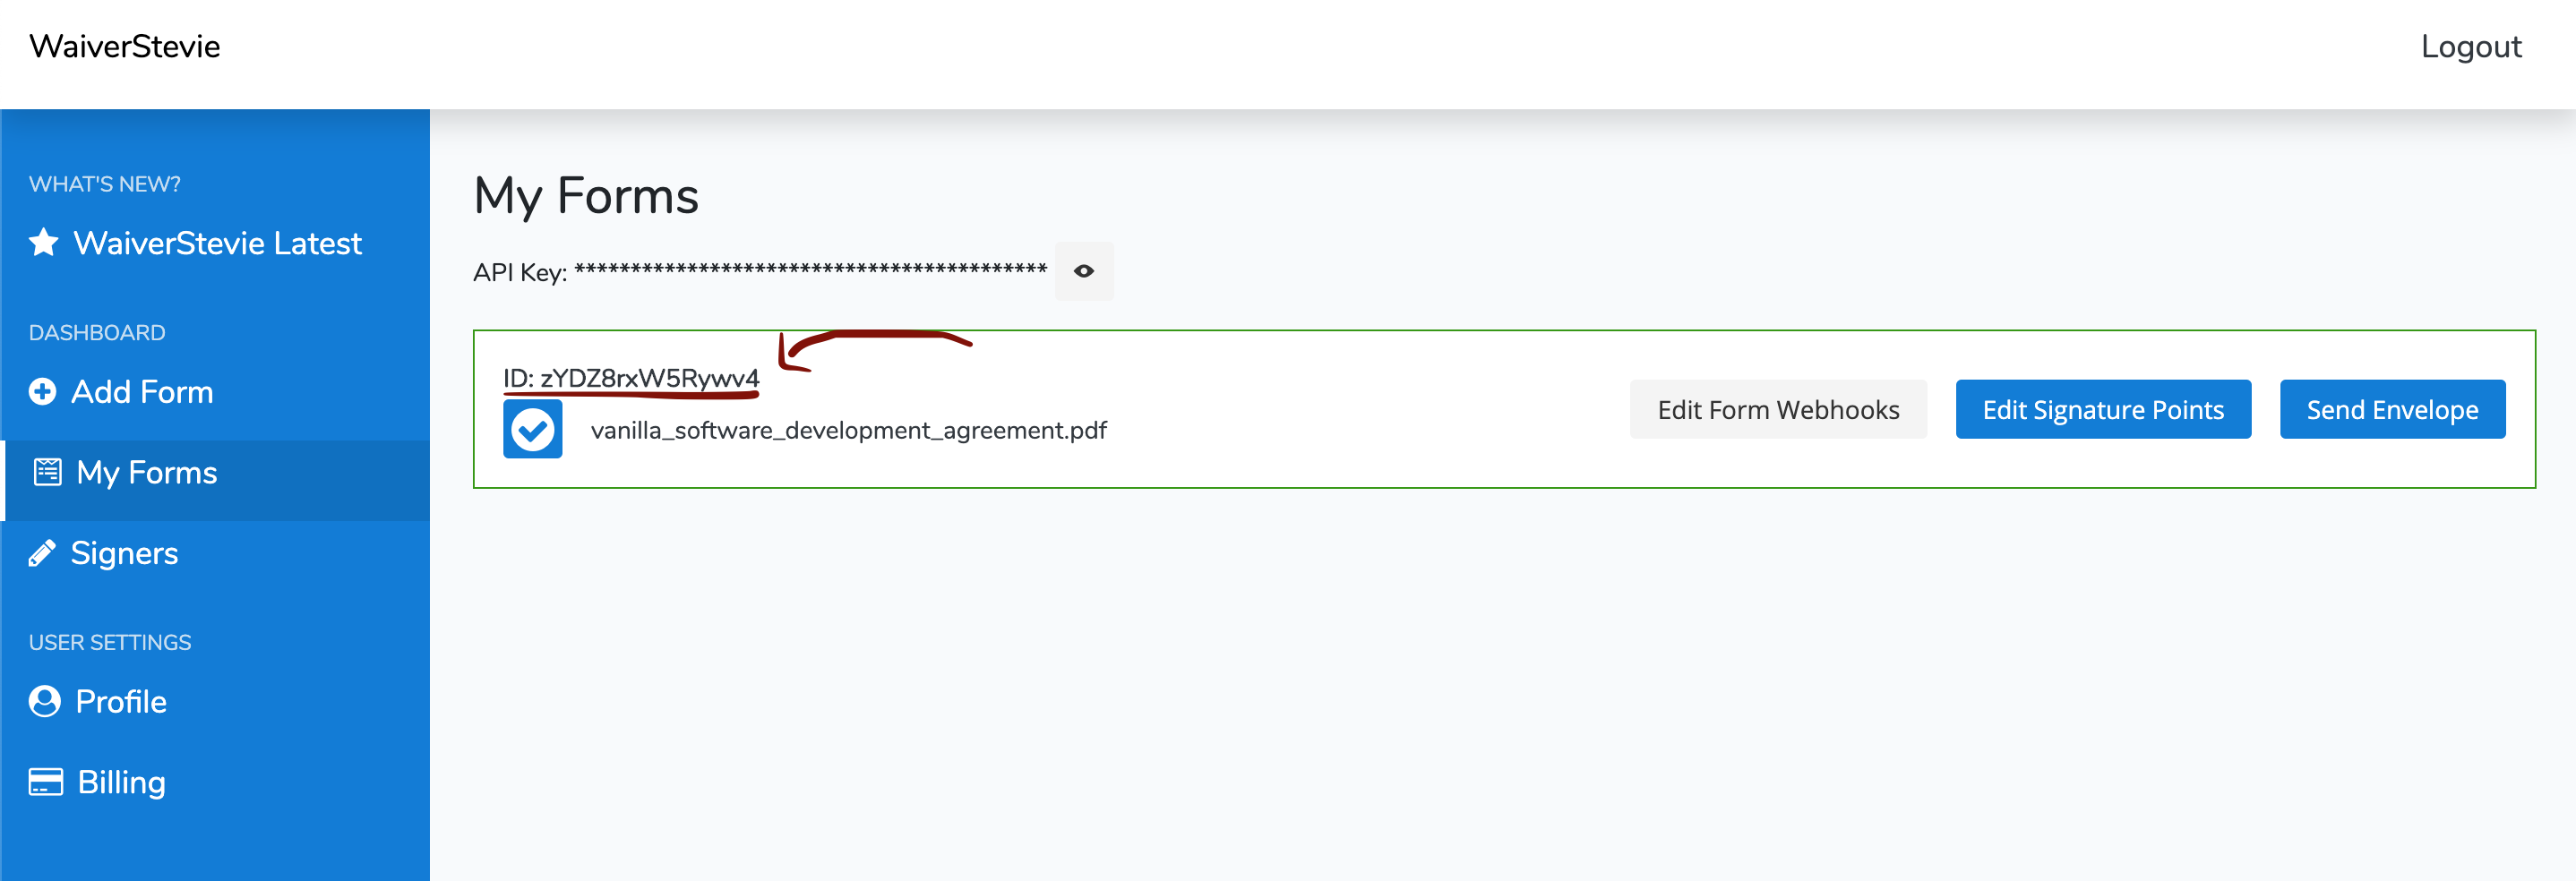
The first thing you need to do is grab your API key from your dashboard. This lets you interface with WaiverCat via code. To do so, login to WaiverCat and navigate to the ‘Developer’ page. Reveal the API key by clicking the button with the “eye” icon on it.
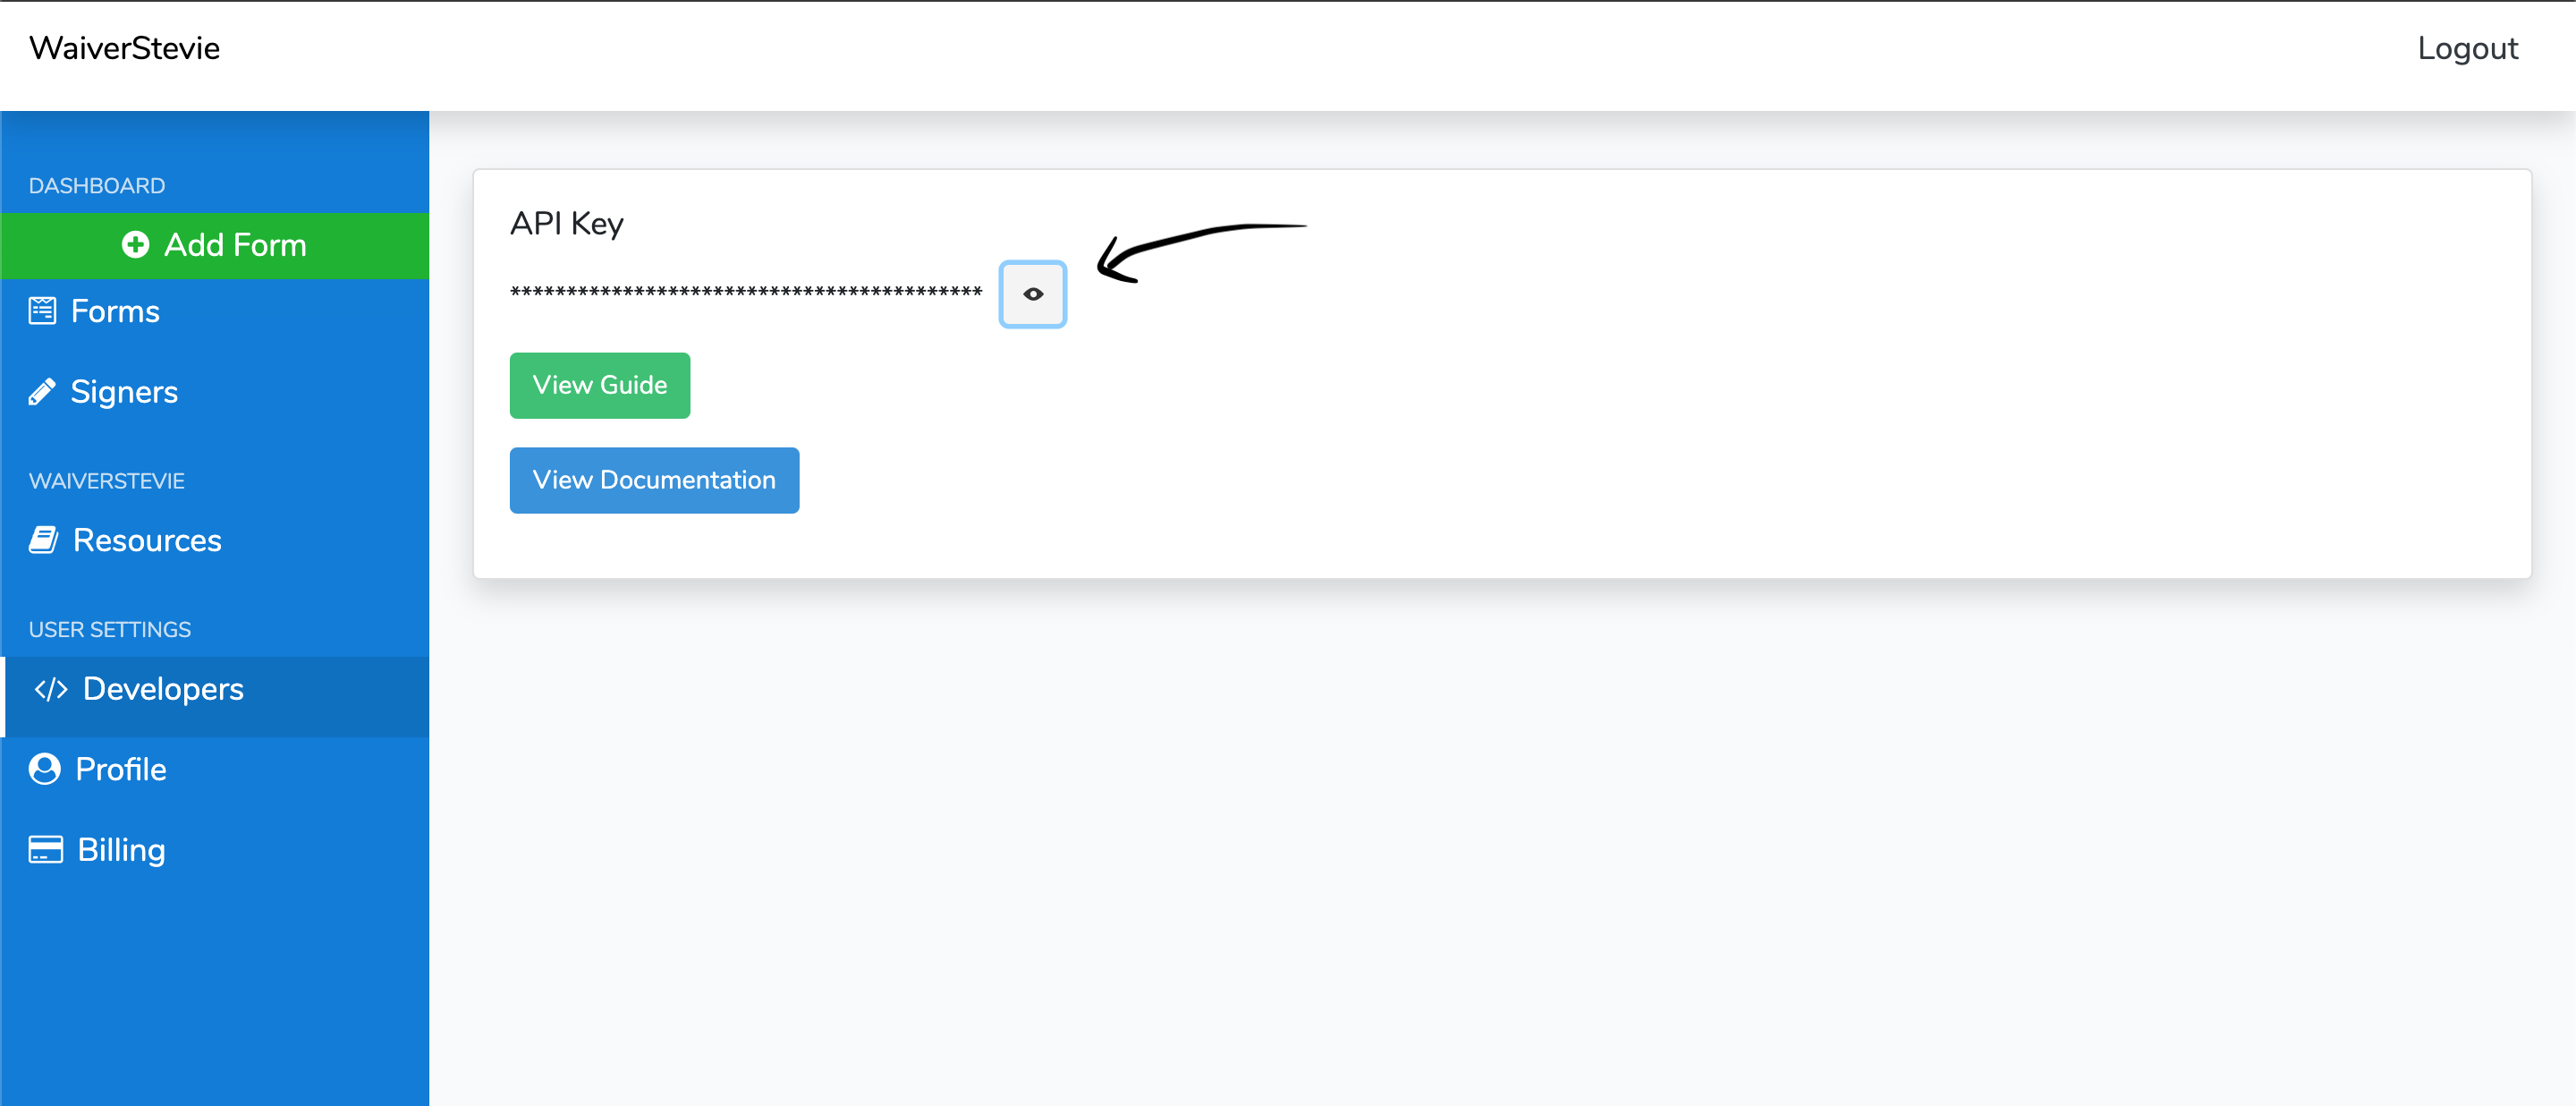 Grabbing your API key
Now that you have your key, let’s add it to our project. Open the config.py project and add the following to the bottom, replacing MY_API_KEY with the actual value you just grabbed:
#config.py, bottom of the file
WS_API_KEY = "MY_API_KEY"
Form ID
Next, grab the ID of the scope of work form we’ve prepared- this will be visible on the ‘Forms’ page of your WaiverCat dashboard.
 Finding the ID of your form
Now save that ID into your config file as well, just below the API key entry:
# In config.py

WS_CONTRACT_ID = 'YOUR_FORM_ID'
Remember to replace YOUR_FORM_ID with the value you just grabbed.
API Background
There are a couple of API methods we will be using:
- The ‘Create Envelope’ method
- The ‘Fetch Envelope’ method
In the first case, we want to be able to send a contract once a client is added. In the second, we want to check-in and see if the client has signed the agreement.
For reference, you can find WaiverCat’s API documentation here
App logic: sending envelopes
First, let’s add code to send a contract when a new client is created.
According to the WaiverCat API, to mail an envelope, we send a POST request to https://app.waivercat.com/api/v2/forms/{id}/envelopes?api_key=<YOUR_KEY> with the following body:
{
  "tags": [
    {
      "key": "string",
      "value": "string"
    }
  ],
  "nickname": "string",
  "send_email": true,
  "signers": [
    {
      "prefilled_fields": [
        {
          "value": "string",
          "label": "string"
        }
      ],
      "email": "string",
      "first_name": "string",
      "last_name": "string"
    }
  ]
}
remember to replace <YOUR_KEY> with your API key grabbed in the API endpoints step
We’ll talk about tags and signers in a second. We can omit the nickname field, and leave send_email as true.
Signers
The signers attribute takes an array. Each item in the array reflects a signer- her first_name, last_name, and email.
Prefilled Fields
You might also supply prefilled_fields for these items , which is WaiverCat’s way of letting you fill out an input for the signer before they even open it.
In this case, we’d like to supply the “cost” field via the API, so we wouldn’t need to manually enter it again. The length of the signers array will match the number of parties expected to sign the document and it will be in order of who’s signing. Recall that our form expects two people to sign- the developer and the client:
{
  // ...
  "signers": [
    {
      "email": "YourEmail@mail.com",
      "first_name": "YourFirstName",
      "last_name": "YourLastName",
      "prefilled_fields": [
        {
          "value": "$150",
          "label": "cost"
        }
      ]
    },
    {
      "email": "YourClient@mail.com",
      "first_name": "ClientFirstName",
      "last_name": "ClientLastName"
    }
  ]
}
We’ll hardcode the first signer to be your info. Add the following to config.py, except use your actual info:
DEV_EMAIL = "johnsmith@gmail.com"
DEV_FIRST_NAME = "John"
DEV_LAST_NAME = "Smith"
For the second signer, we’ll use the client email and name that’s added in the project organizer app. More on that soon.
Tags
Tags are simple key-value pairs that can be attached to an evelope. Storing your own metadata turns out to be useful since the API allows for searching envelopes by tags. In short, we will tag envelopes with the project IDs from our app and then easily search by project to see which contracts have been filled:
{
  // ...
  "tags": [
    {
      "key": "project_id",
      "value": "234"
    }
  ]
}
Bear with me if this does not make sense yet.
Hitting endpoints
To hit the WaiverCat API from our python app, we’ll use the popular requests library. Install it first:
# from your virtualenv if you have one
# source env/bin/activate
pip install requests

# also save our project requirements
pip freeze > requirements.txt
And then import it at the top of your main.py file:
import requests
Finally, locate the add_project definition in main.py and replace the entire block with this:
@app.route("/projects", methods=["POST"])
def add_project():
    if not session.get('logged_in'):
        return redirect("/login")
    contact_email = request.form.get('contact_email', type=str)
    contact_name = request.form.get('contact_name', type=str)
    quote_cost = request.form.get('quote_dollars', type=int)
    is_complete = request.form.get('is_complete')

    # break out first and last name if appropriate
    name_arr = contact_name.split(" ", 1)
    contact_first_name = name_arr[0]
    contact_last_name = name_arr[1] if len(name_arr) > 1 else ""

    db = get_db()
    cursor = db.cursor()
    cursor.execute(
        'insert into projects (contact_email,contact_name,contract_type,quote_dollars,is_complete) values (?,?,?, ?, ?)',
        (
            contact_email,
            contact_name,
            'hourly' if request.form.get(
                'contract_type') == "hourly" else "milestone",
            quote_cost,
            0 if not is_complete else 1
        )
    )
    project_id = cursor.lastrowid
    db.commit()
    db.close()
    # Code for hitting WaiverCat API
    r = requests.post('https://app.waivercat.com/api/v2/forms/' + app.config['WS_CONTRACT_ID'] + "/envelopes?api_key=" + app.config['WS_API_KEY'], json={
        "tags": [
            {
                "key": "project_id",
                "value": str(project_id) # so we can check on this projects contract easily
            }
        ],
        "signers": [
          # Your information
            {

                "email": app.config['DEV_EMAIL'],
                "first_name": app.config["DEV_FIRST_NAME"],
                "last_name": app.config["DEV_LAST_NAME"],
                "prefilled_fields": [
                    {
                        "label": "Cost",
                        "value": "$" + str(quote_cost) # prefill the cost of the project
                    }
                ]
            },
            # The clients information
            {
                "email": contact_email,
                "first_name": contact_first_name,
                "last_name": contact_last_name
            }
        ],
        'preset_values': [
            {

            }
        ],
        "send_email": True
    })

    return redirect(url_for('home'))
Now, whenever a project is created a contract is mailed to you to sign. Once you sign it, your client will get it!
The things we had to do were:
- Separate the full name of the client into a first and last name.
- Hit the WaiverCat
Create Envelopeendpoint with the relevant data.
This is great. The only thing left is to track these envelopes directly from the app.
If anything doesn’t work at this point, make sure that you updated config.py with your API Key, Form ID, email, first name and last name, and that the info is correct.
# Make sure your config.py has all of this filled out
DATABASE = './flaskr.db'
DEBUG = True


SECRET_KEY = 'development key'
USERNAME = 'admin'
PASSWORD = 'default'

WS_API_KEY = ""  # get from dashboard

WS_CONTRACT_ID = ''  # get from dashboard
DEV_EMAIL = ""  # your email
DEV_FIRST_NAME = ""  # your name
DEV_LAST_NAME = ""  # your last name
App logic: checking signatures
Go ahead and add a project. Make sure you’re getting the signature request upon creation. Everything is great, except our app doesn’t know when the contract is completed; we’re going to change that.
There are two ways for the app to know the status of a contract:
- By asking WaiverCat often.
- By having WaiverCat tell it when an update is made.
The second option is ideal, and we’ll eventually go that route. But the project tracking app was only made to run locally for now, so WaiverCat would have no way of pinging it as documents got signed. So let’s start by having our app ask WaiverCat for updates manually.
Polling WaiverCat for contract status
The WaiverCat Get Envelope API method returns all envelopes for a specific form. We’d like to check on one envelope at a time though and update its status, so we’ll use the tag_* parameter:
tag_*: A tag to filter responses by. Prefix with “tag*” If you pass “tag_age=new” then the response will only include envelopes with a tag where the key is “age” and the value is “new”
Since we tag each envelope with its project id, we can search for a project’s envelope like this:
endpoint + '&tag_project_id=' + str(project_id)
Markup Update
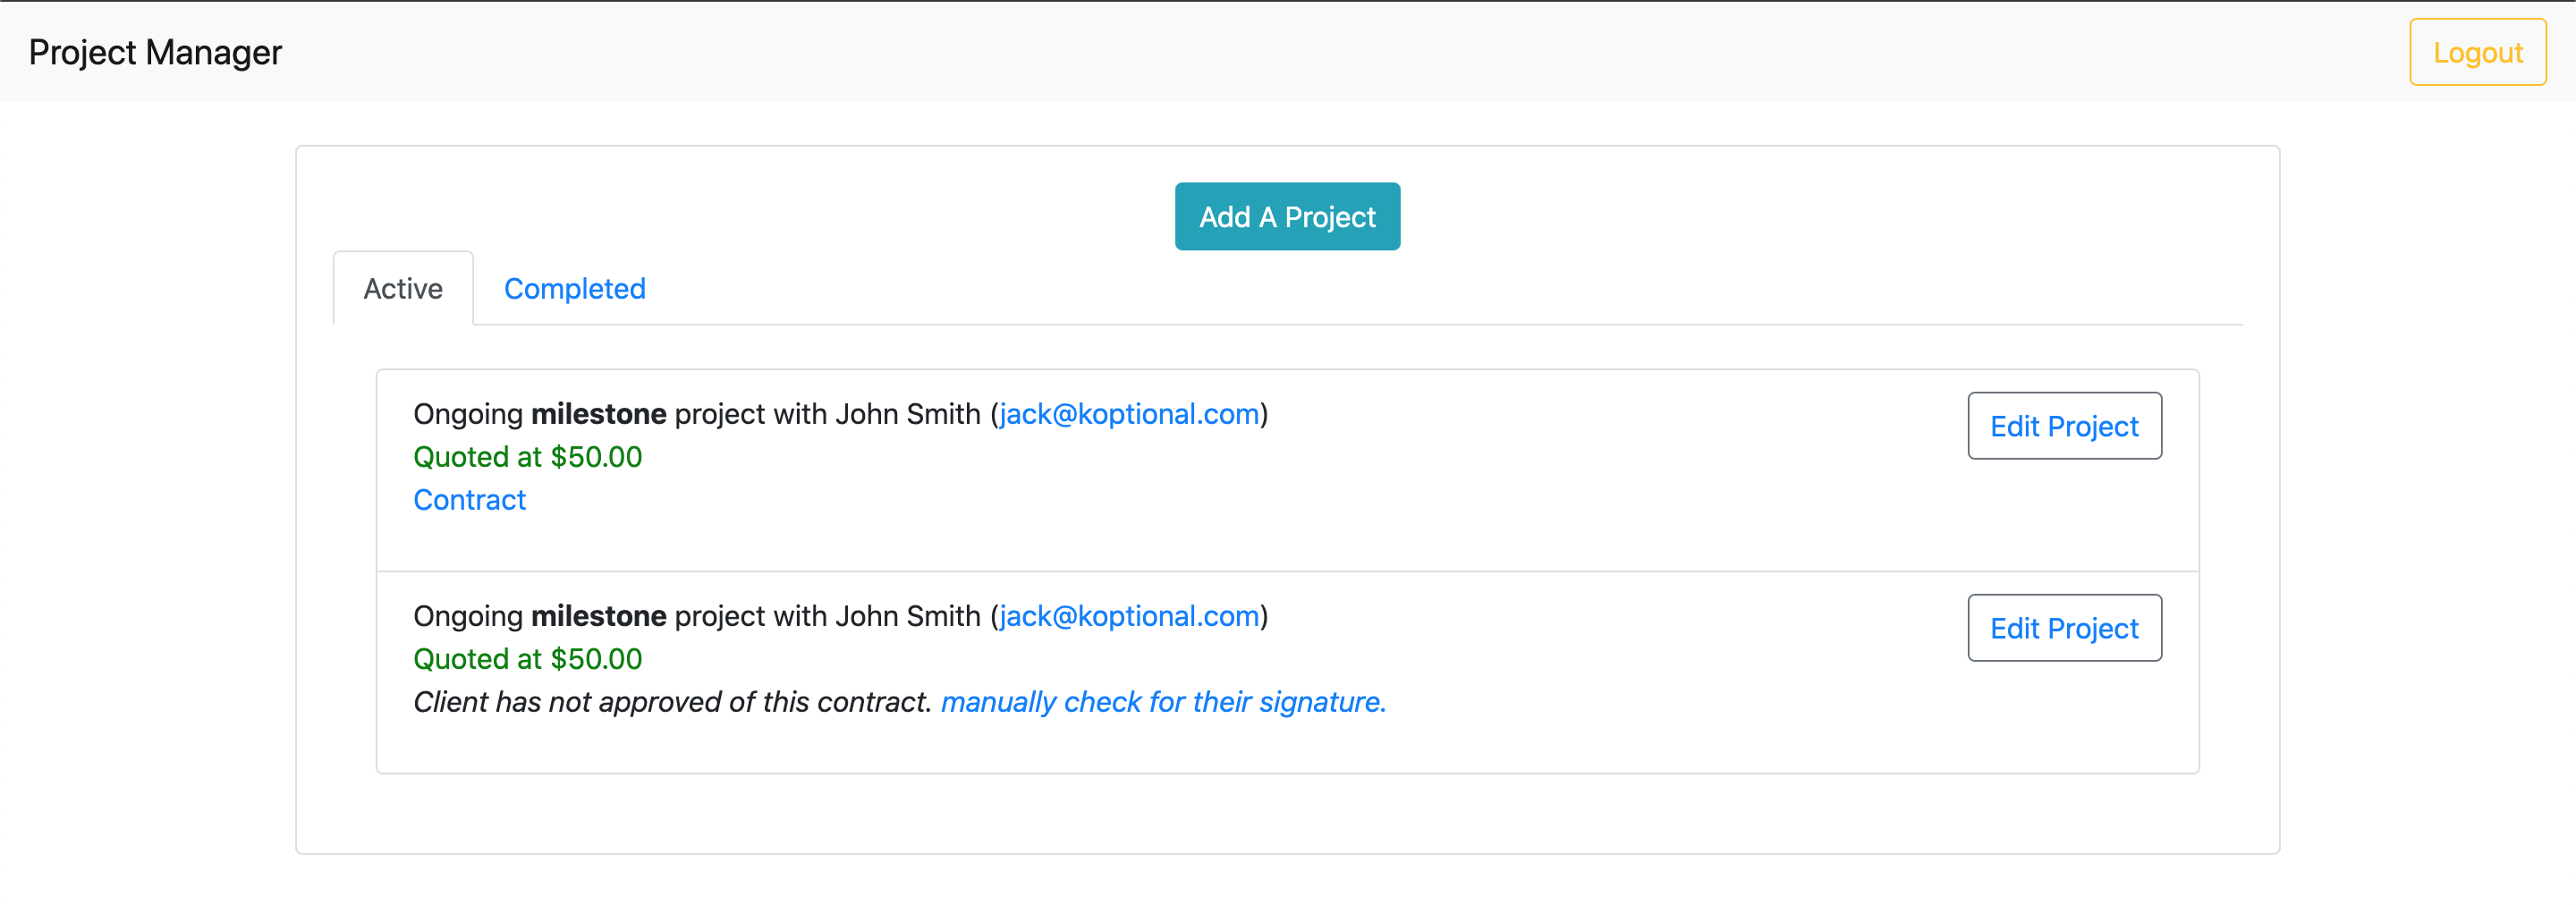
Let’s add a link under each project that you can click to refresh that project’s contract status. So open templates/home.html and change these lines:
<span class="not-signed">
  Client has not approved of this contract.
  <a href="#"> manually check for their signature. </a>
</span>
to
<span class="not-signed">
  Client has not approved of this contract.
  <a href="/projects/contract-check/{{ entry['id'] }}">
    manually check for their signature.
  </a>
</span>
To summarize, clicking that link directs the browser to /projects/contract-check/:project_id- that is to say, sends a GET request to that endpoint (which we are about to implement). The app must receive the request, ask WaiverCat for the latest contract status (signed? not signed?), and then direct the browser back to the home page.
New Endpoint
Add this block to the bottom of main.py- it’s the logic for refreshing a project’s status:
@app.route("/projects/contract-check/<int:project_id>", methods=["GET"])
def manually_check_for_signature(project_id):
    r = requests.get("https://app.waivercat.com/api/v2/forms/{}/envelopes?api_key={}&tag_project_id={}".format(
        app.config['WS_CONTRACT_ID'], app.config['WS_API_KEY'], project_id))
    body = r.json()
    if len(body["data"]) > 0:
        # Update the database accordingly
        signers = body["data"][len(body["data"]) - 1]["signers"]
        final_pdf = signers[len(signers)-1]["signed_pdf"]
        if final_pdf:
            db = get_db()
            db.execute(
                '''UPDATE projects SET signed_pdf=? where id=?''',
                (
                    final_pdf,
                    project_id
                )
            )
            db.commit()
            db.close()
    return redirect(url_for('home'))
That code grabs the dynamic project_id parameter, and asks WaiverCat for envelopes matching that tag. It expects there to be a single envelope, and checks to see if the signed_pdf parameter is present. If it is, that means the document is signed and we’ll save the URL. Then, no matter what, the block redirects to the home page, presumably where the request came from in the first place.
Note that we use body["data"][len(body["data"]) - 1] instead of body["data"][0]. This way, if we send two envelopes for the same project, we’ll only worry about the most recent one.
Let’s see how this works. Open your app and create a project- use an email that you own for the client. You should see the project appear with an incomplete contract status. Also, you should have received the WaiverCat request to sign on the email you added to config.py. Go through the signing flow for the developer AND the client (check the email you used for ‘client email’).
You’ll notice the cost you set on the project will be present on the contract! Once you’ve signed with both parties click the ‘manually check for their signature’ link we just added. The page should reload and voilla, a link to the signed document should appear.
 Manual check for contract signature status
Conclusion
Hopefully this simple app gave you some insight into making eSign work within your system. We created WaiverCat for this exact purpose. If you have any questions, or want a promo code, don’t hesitate to email info@waiverstevie.com.